Open Source Brushless Gimbal Controller
- Themenstarter RC FAN2
- Beginndatum
- Status
- Nicht offen für weitere Antworten.
Hi guys, I`m having great problems here tuning my Open Source gimbal.
The only way I can get it to match the horizon in roll from -90 degrees to +90 degrees is to have ACC weight at 0.001 with my P Roll at 34. To do this I have to have my PWM very low at 60 ( using a Turnigy 4008 wound to 16 ohms over 2 phases )
Even though it keeps its horizon, once in the air and a few roll maneuvers are performed the roll looses its horizon and it takes that long to recover I have to land an wait :
[video=youtube;3OguQTJXIHQ]http://www.youtube.com/watch?v=3OguQTJXIHQ&feature=youtu.be[/video]
I can not raise PWM because no matter where I set D the vibrations will not stop
I can not drop P because it will not match the horizon unless I take ACC weight up to 7, then it is too slow, but does catch up to the horizon if I keep the Hex at that position.
Current settings :
Pitch Roll
P 20 38.0
I 0.01 0.01
D 0.08 0.24
PWM 60 80
ACC weight 0.001
Can anyone offer any tips on how to fix this problem, or a tuning guide to get it setup properly ?
Thanks
Ian ( Coyote )
It sounds to me as if the engines were somewhat underutilized.
If you use-3S 11.1V Have you ever tested 2S 7.4V for the gimbal?
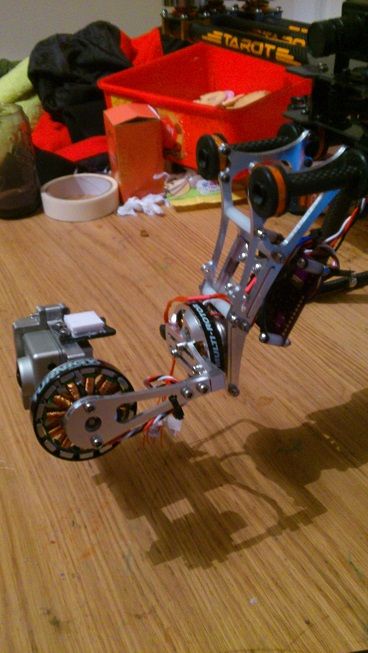
Can you ever please post a picture of your gimbal. Sometimes you can also detect the error.ACC can not make small enough.
It is even needed to start and rarely in flight.My ACC value is currently 0.0002
GreetingsHenry
Vielen vielen Dank euch beiden, ihr habt meinen Tag gerettet!
Habe die Kabel jetzt auf ein Minimun gekürzt, verdrillt und von Motorkabeln entfernt verlegt und nun funktionierts perfekt!
Jetzt konnte ich auch an den PID`s drehen und ein reproduzierbares Verhalten erzielen, nach zwei Tagen erfolgloser Herumstellerei mit völlig willkürlichem Verhalten des Gimbals hatte ich schon arge Selbstzweifel
Habe gerade im halbdunklen noch einen kurzen Testflug gemacht, das Ergebnis kann ich aber nicht zeigen, es ist absolut verwackelt weil ich's mit Nick P wohl zu gut gemeint hab.
Vielen Dank nochmal!
Viele Grüße
Henry
Hi Martinez,
ja, das Board ist von Dir.. die erste Version (2.2 mein ich)
Die 046b ist drauf, aber sobald ich den Akku anschließe, gehen beide Achsen rund. Mit der original geliefertern Version (039) lief das Board..
Martinez, was muss ich da nun einstellen ? (Was hattest Du in der 039 drin ? MPU low oder high?)
@the highlander, MPU is mounted upside down.. it worked already with firmware 039...
Auf mein kleinen GoPro Gimbal hab ich auch die V2.2 mit der 046b drauf.... läuft!
Gruß
Martinez
Hello Ian,
OK Thank you,
You should definitely test the gimbal with a lower voltage.
- Can you put the camera on the pitch axis easily without turning the you realize a lot of resistance from the IMU cable?
- May vibrate the IMU cable and thus falsify the sensor values ​​..
Greetings Henry
OK Thank you,
You should definitely test the gimbal with a lower voltage.
- Can you put the camera on the pitch axis easily without turning the you realize a lot of resistance from the IMU cable?
- May vibrate the IMU cable and thus falsify the sensor values ​​..
Greetings Henry
Hallo zusammen,
hier mal ein kleiner Clip zum Thema:
- Gimbal Balance
- How much Power do you need
Vielleicht hilft es ja dem Einen oder Anderen ...
http://www.youtube.com/watch?v=pFRHZJ8TVxw&feature=youtu.be
Vielleicht als kurzer Hintergrund dazu:
Ist das Gimbal nicht richtig ausbalanciert, dann braucht man mehr Leistung (MAX-PWM) Je mehr Leistung man braucht umso zitteriger wird das Ganze System und man nähert sich dem Optimum nicht bzw. schlecht.
Dazu kommt noch das kein gleichmäßiges Dreh/Haltemoment zur Verfügung steht, und sämtliche Bewegungen unrund laufen. Insbesondere die PID- Regelung dürfte davon betroffen sein.
Viele Grüße
Henry
Zuletzt bearbeitet:
ok guys been working on this
Brushless Gimbal
Worldwide first Open Source Brushlessgimbal Controller
Brushlessgimbal.de
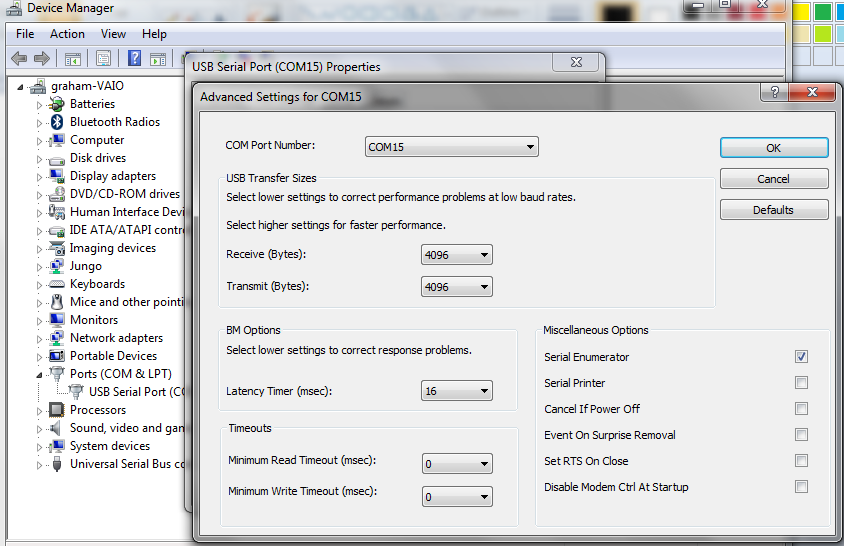
when you receive any Brushless Gimbal Controller that is running the Open source project, you might run into some of the following problems when connecting to the computer. when connecting windows will install all the drivers for you but if it set's the com port above 9 when you go to connect to the GUI configuration software it will not connect.
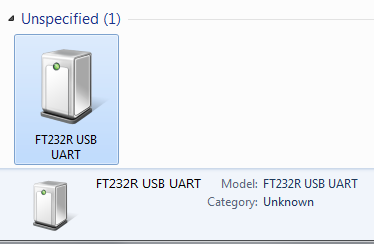
if you right click and go to properties you will see this next image
as you can see in this image windows has assigned COM 15, so this will not allow you to connect to the GUI So you need to change this to between COM 1 to 9
then you will be able to connect.
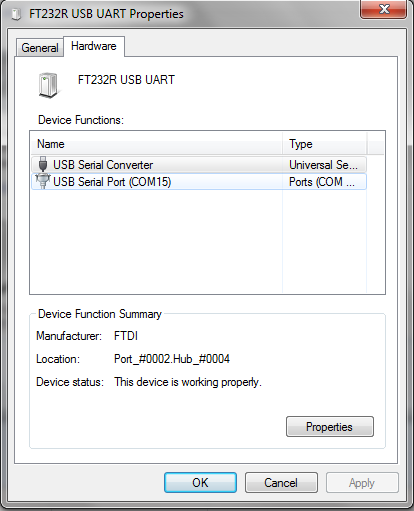
To change the COM port go to your computer icon on your desktop and right click and go to properties then click on device manager this will open

click on the USB Serial Port (COM15) and this will open
click on the Port Settings and you will see this image
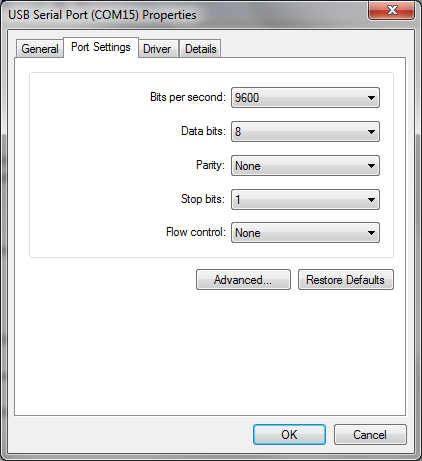
this will open this image next
click on the com port settings tab and this will open
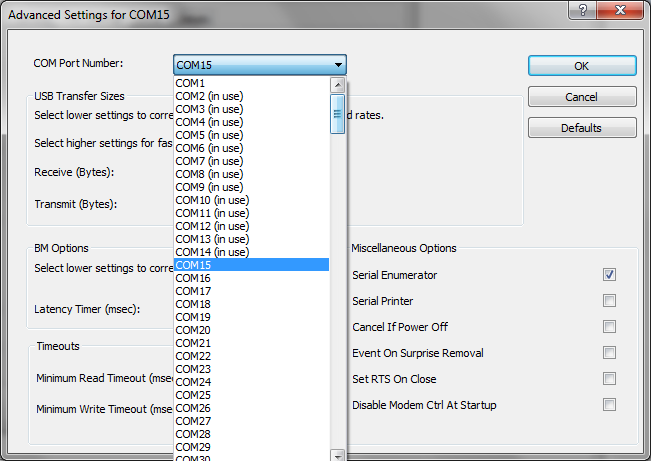
change this to a com port that is not in use (if you find that they are all in use) then select one that is between (1 to 9) and click OK.
Arduino
Now that you have got connected we need to load the code that can be found here https://code.google.com/p/brushless-gimbal/downloads/list
when you have down loaded the software and unzipped it you will also need Arduino this can be found here http://arduino.cc/en/Main/Software
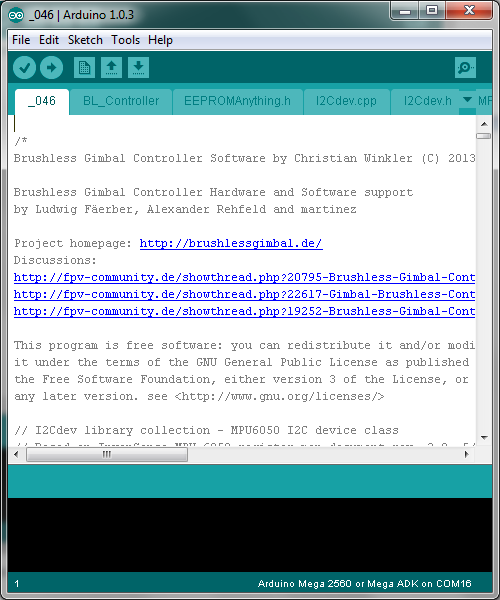
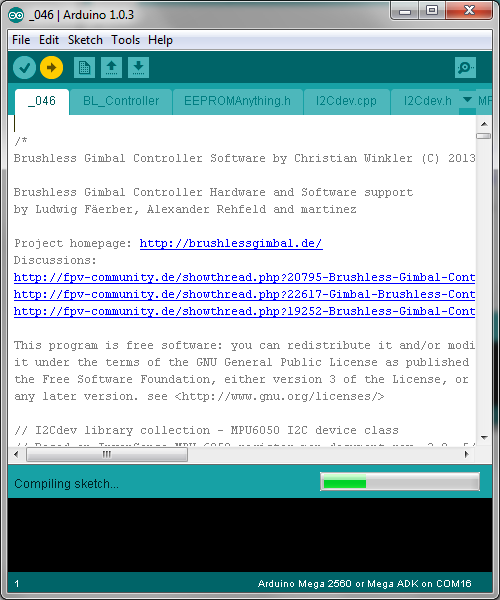
Ok now that you have the software that is needed we will load the code, to do this you need to start up Arduino. Go to the folder that you have unzipped Arduino and look for the Ardunio.exe file as in the picture
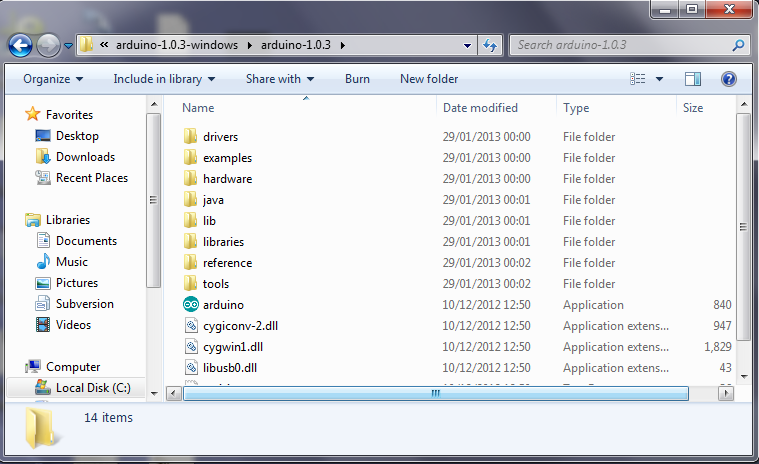
click the icon to start the programme
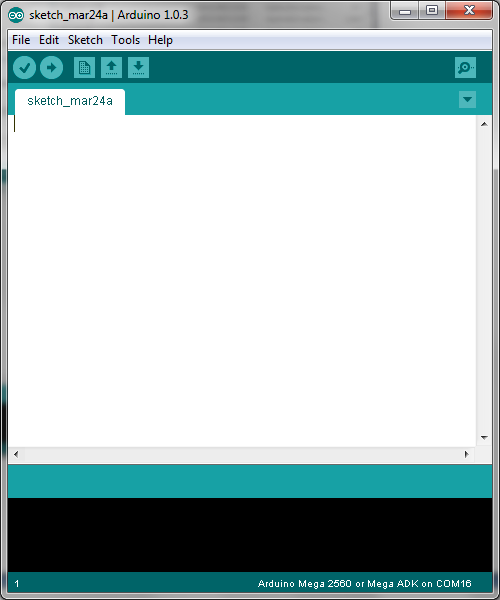
now we need to load the code for the brushless gimbal, click on file then open and then navigate to the folder were you have your gimbal software saved as seen here
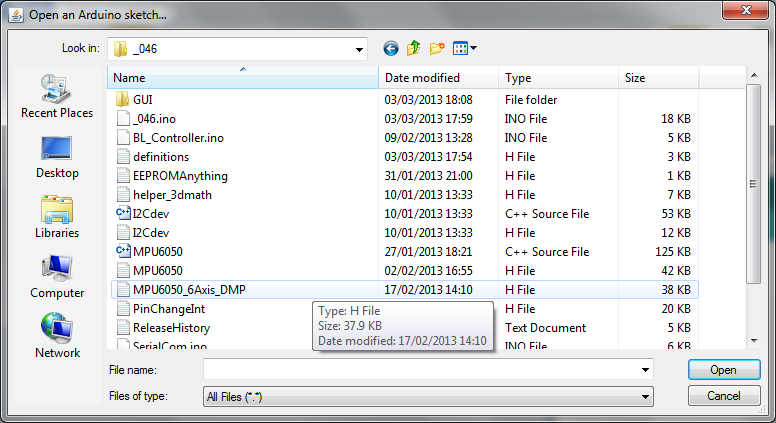
click on the 046.ino (just for this example) to open the code
now that you have the code open there is at the time of writing this manual only 1 thing that you might have to change and this is under the Definitions.h tab
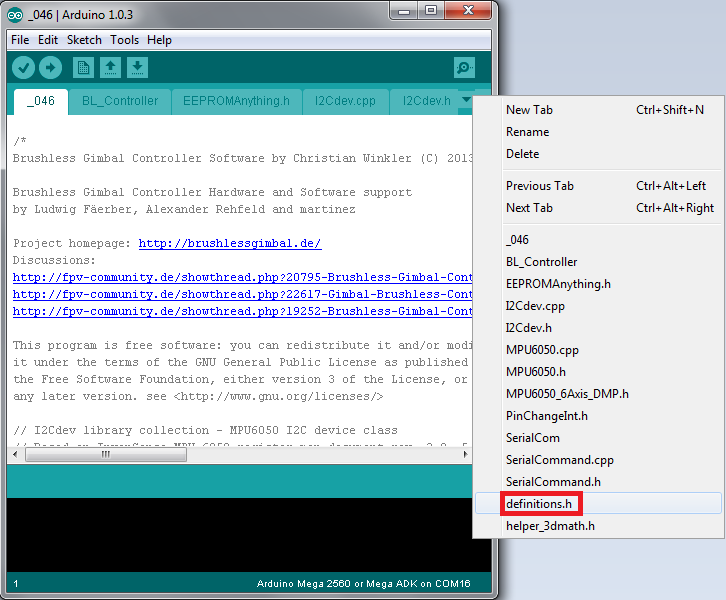
when loaded you will see at the top there is the following code
// MPU Address Settings
#define MPU6050_ADDRESS_AD0_LOW 0x68 // default for InvenSense evaluation board
#define MPU6050_ADDRESS_AD0_HIGH 0x69 // Drotek MPU breakout board
#define MPU6050_DEFAULT_ADDRESS MPU6050_ADDRESS_AD0_HIGH
if you find that when you have loaded th code that your sensor is not working and you are NOT getting any readings from this then you must reload this code and change the
#define MPU6050_DEFAULT_ADDRESS MPU6050_ADDRESS_AD0_HIGH
to
#define MPU6050_DEFAULT_ADDRESS MPU6050_ADDRESS_AD0_LOW
re upload the code and you should find that this will fix the sensor error.
To load the code to your board you need to select the following correctly or you will just get an error
click on the Tools tab in the top menu and select the correct board that you have (this is just an example)
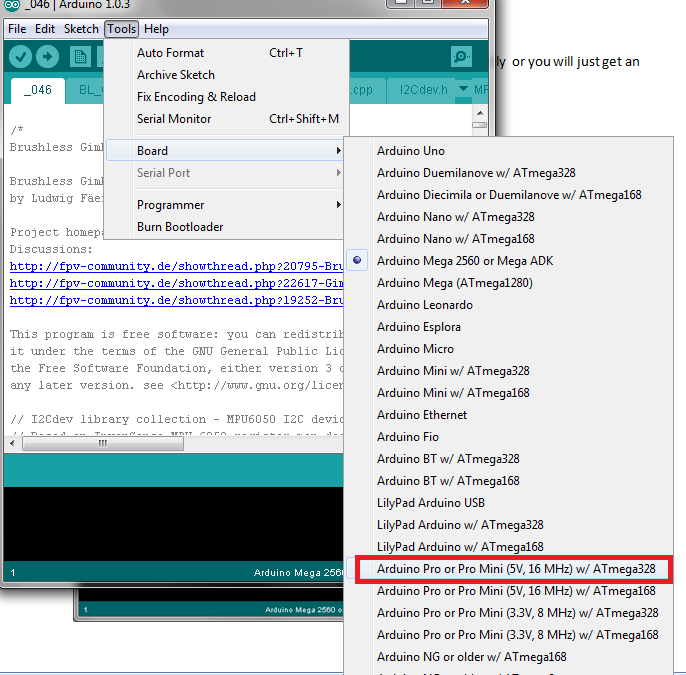
next you must select the correct com port this have normally only one listed, click on this to select the com port, Now we can upload the code click on the upload button

The next screen shows the code being compiled and then uploaded to your controller board
Now its time to connect to your Brushless Gimbal and start tuning your settings
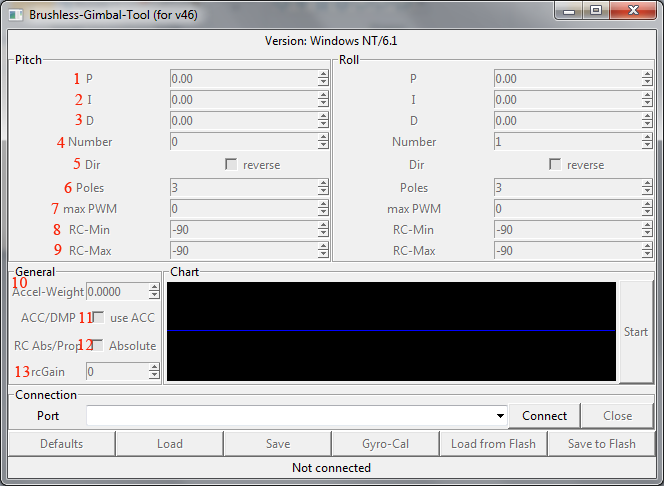
The GUI
This is the software that you will use to adjust the setting on your Brushless Gimbal Controller
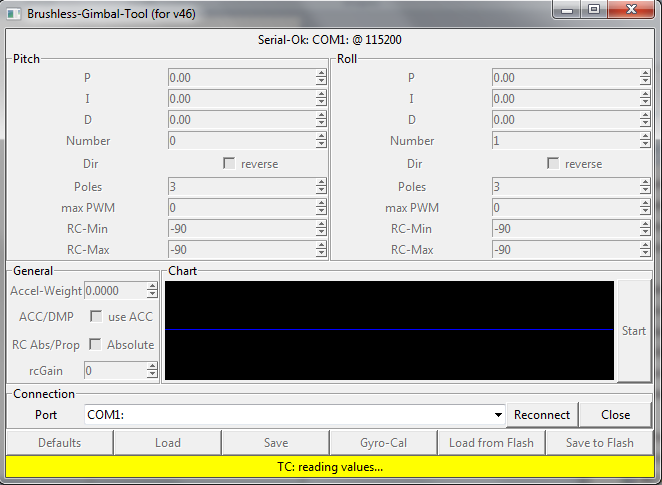
NOW if you have not changed the COM port as above then you will get this error
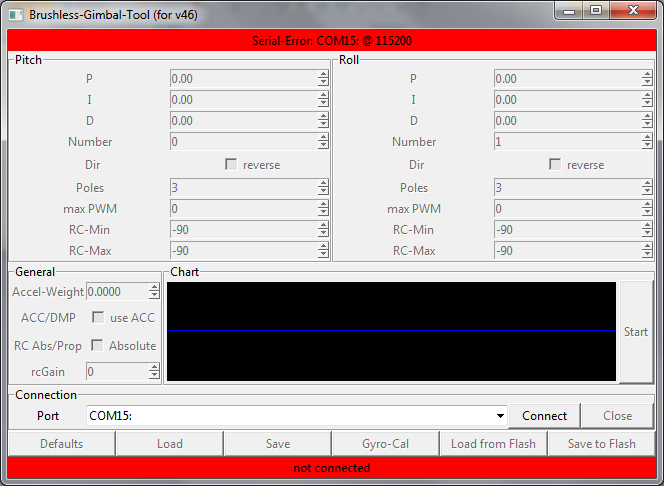
Then you have made the changes to the Com Port then you should see the following images when you click Connect
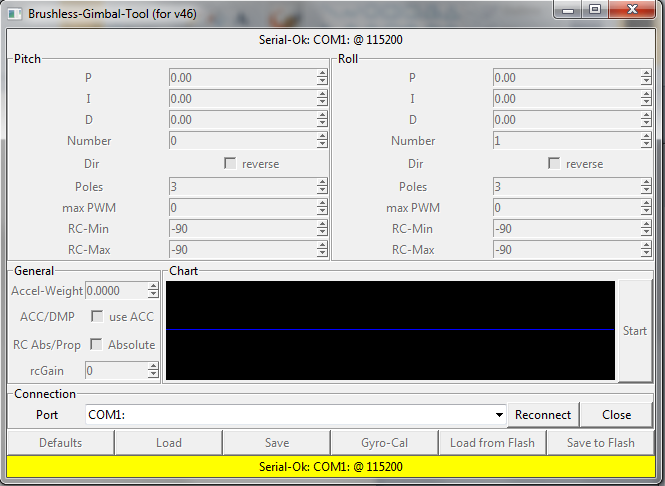
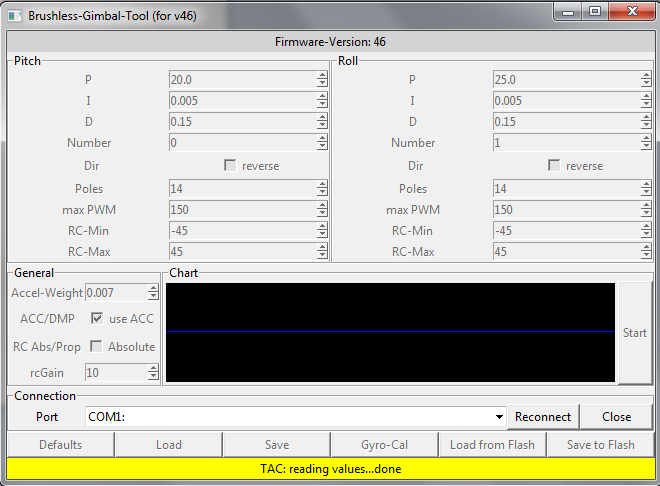
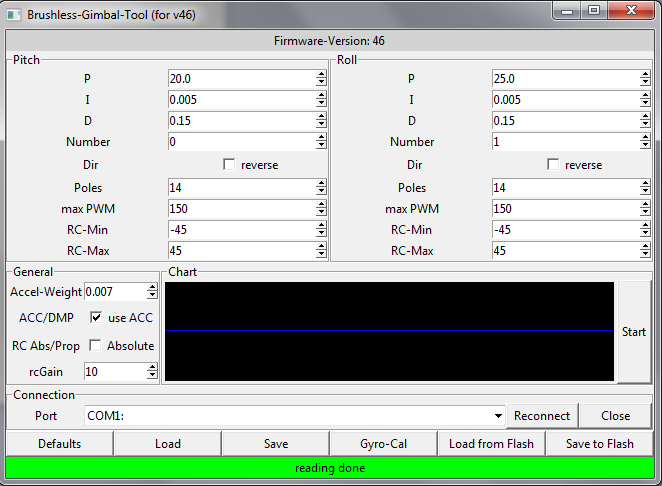
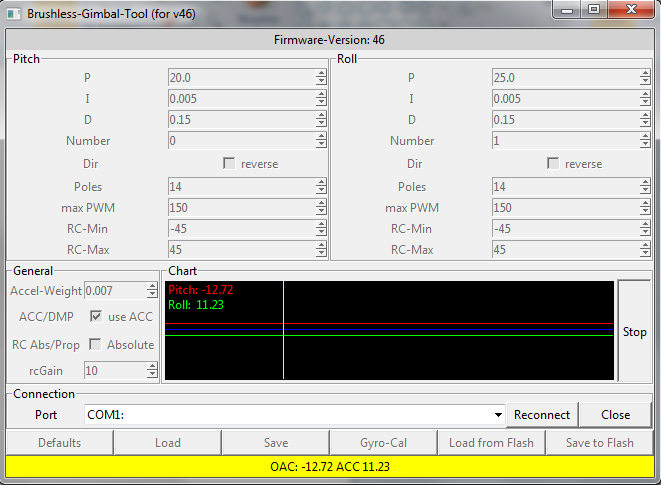
YES your connected to your Brushless Gimbal Controller. Now to check your Sensor reading please click on the Start button and you will see the following screens
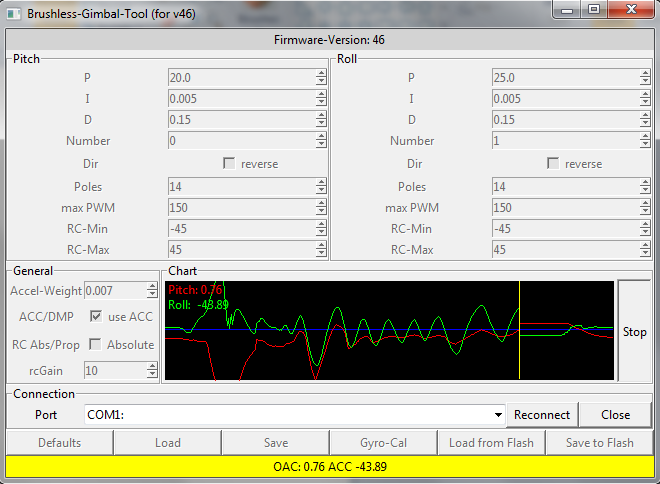
Tuning your Gimbal
when you have uploaded the software and connect to your board, the software will load the default settings. You will need to change these to suit your gimbal and motors
1. First thing to do is to set the ACC-Weight to Zero (Number 10)
2. Next start to make it in 0,0005 steps high until the Gimbal does no more drift
(what is drift)
when you set the ACC-Weight to Zero , the gimbal begin to move slowly to one side
that is drift it will not sit level.
3. Next , adjust (increase) the P Term in 1.0 Steps (Number 1) stop when the movement is perfect if you go too far the motor will start to vibrate
4. minimize the MAX PWM Steps (Number 7) as much as possible this will also help to stop the vibration in the motor, when you have got NO vibration you are ready
5. If you still have some problems start to adjust the D Term in 0,005 steps higher until the motor stops vibrating.
6. (Number 10) is the ACC weight this is to eliminate the Drift from the Gyro.
7. (Number 11) is to switch between ACC and DMP Mode
ACC Mode is the better one , DMP is only to test it.
8. (Number 12) Absolute or Proportional mode is for RC Channel,
Proportional is when you are using a second RC Transmitter to control your Gimbal
Absolute for normal Pot control on your RC Transmitter.
9. (Number 13) Is the RC Gain , how fast it react when you are change you RC channel you have it connected to.
Please note: (Number 4) is the motor, if you find that the wrong motor is connected you can just change the 0 to the 1 and this will save unplugging your motors.
(Number 5) is for reversing your motor if it is rotating in the wrong direction.
(Number 6) is the amount of poles your motor has.
(Number 8 & 9) is the amount or rotation your motor will make on that axis.
Software License :
http://www.gnu.org/licenses/
Arduino software:
http://arduino.cc/en/Main/Software
Latest Software:
http://code.google.com/p/brushless-gimbal/downloads/list
Credits
Manual: By Graham Miller
Brushless Gimbal: By Ludwig Faerber
GUI: By Meister
Software: By
Christian Winkler , Ludwig Faerber and Alexander Rehfeld
All rights reserved
Brushless Gimbal
Worldwide first Open Source Brushlessgimbal Controller
Brushlessgimbal.de
when you receive any Brushless Gimbal Controller that is running the Open source project, you might run into some of the following problems when connecting to the computer. when connecting windows will install all the drivers for you but if it set's the com port above 9 when you go to connect to the GUI configuration software it will not connect.
if you right click and go to properties you will see this next image
as you can see in this image windows has assigned COM 15, so this will not allow you to connect to the GUI So you need to change this to between COM 1 to 9
then you will be able to connect.
To change the COM port go to your computer icon on your desktop and right click and go to properties then click on device manager this will open
click on the USB Serial Port (COM15) and this will open
click on the Port Settings and you will see this image
this will open this image next
click on the com port settings tab and this will open
change this to a com port that is not in use (if you find that they are all in use) then select one that is between (1 to 9) and click OK.
Arduino
Now that you have got connected we need to load the code that can be found here https://code.google.com/p/brushless-gimbal/downloads/list
when you have down loaded the software and unzipped it you will also need Arduino this can be found here http://arduino.cc/en/Main/Software
Ok now that you have the software that is needed we will load the code, to do this you need to start up Arduino. Go to the folder that you have unzipped Arduino and look for the Ardunio.exe file as in the picture
click the icon to start the programme
now we need to load the code for the brushless gimbal, click on file then open and then navigate to the folder were you have your gimbal software saved as seen here
click on the 046.ino (just for this example) to open the code
now that you have the code open there is at the time of writing this manual only 1 thing that you might have to change and this is under the Definitions.h tab
when loaded you will see at the top there is the following code
// MPU Address Settings
#define MPU6050_ADDRESS_AD0_LOW 0x68 // default for InvenSense evaluation board
#define MPU6050_ADDRESS_AD0_HIGH 0x69 // Drotek MPU breakout board
#define MPU6050_DEFAULT_ADDRESS MPU6050_ADDRESS_AD0_HIGH
if you find that when you have loaded th code that your sensor is not working and you are NOT getting any readings from this then you must reload this code and change the
#define MPU6050_DEFAULT_ADDRESS MPU6050_ADDRESS_AD0_HIGH
to
#define MPU6050_DEFAULT_ADDRESS MPU6050_ADDRESS_AD0_LOW
re upload the code and you should find that this will fix the sensor error.
To load the code to your board you need to select the following correctly or you will just get an error
click on the Tools tab in the top menu and select the correct board that you have (this is just an example)
next you must select the correct com port this have normally only one listed, click on this to select the com port, Now we can upload the code click on the upload button
The next screen shows the code being compiled and then uploaded to your controller board
Now its time to connect to your Brushless Gimbal and start tuning your settings
The GUI
This is the software that you will use to adjust the setting on your Brushless Gimbal Controller
NOW if you have not changed the COM port as above then you will get this error
Then you have made the changes to the Com Port then you should see the following images when you click Connect
YES your connected to your Brushless Gimbal Controller. Now to check your Sensor reading please click on the Start button and you will see the following screens
Tuning your Gimbal
when you have uploaded the software and connect to your board, the software will load the default settings. You will need to change these to suit your gimbal and motors
1. First thing to do is to set the ACC-Weight to Zero (Number 10)
2. Next start to make it in 0,0005 steps high until the Gimbal does no more drift
(what is drift)
when you set the ACC-Weight to Zero , the gimbal begin to move slowly to one side
that is drift it will not sit level.
3. Next , adjust (increase) the P Term in 1.0 Steps (Number 1) stop when the movement is perfect if you go too far the motor will start to vibrate
4. minimize the MAX PWM Steps (Number 7) as much as possible this will also help to stop the vibration in the motor, when you have got NO vibration you are ready
5. If you still have some problems start to adjust the D Term in 0,005 steps higher until the motor stops vibrating.
6. (Number 10) is the ACC weight this is to eliminate the Drift from the Gyro.
7. (Number 11) is to switch between ACC and DMP Mode
ACC Mode is the better one , DMP is only to test it.
8. (Number 12) Absolute or Proportional mode is for RC Channel,
Proportional is when you are using a second RC Transmitter to control your Gimbal
Absolute for normal Pot control on your RC Transmitter.
9. (Number 13) Is the RC Gain , how fast it react when you are change you RC channel you have it connected to.
Please note: (Number 4) is the motor, if you find that the wrong motor is connected you can just change the 0 to the 1 and this will save unplugging your motors.
(Number 5) is for reversing your motor if it is rotating in the wrong direction.
(Number 6) is the amount of poles your motor has.
(Number 8 & 9) is the amount or rotation your motor will make on that axis.
Software License :
http://www.gnu.org/licenses/
Arduino software:
http://arduino.cc/en/Main/Software
Latest Software:
http://code.google.com/p/brushless-gimbal/downloads/list
Credits
Manual: By Graham Miller
Brushless Gimbal: By Ludwig Faerber
GUI: By Meister
Software: By
Christian Winkler , Ludwig Faerber and Alexander Rehfeld
All rights reserved
Zuletzt bearbeitet:
Hi Henry ,
Passt")
Wenn du nix dagegen hast , poste ich das mit auf der 1. Seite ?
Scheinbar sind gerade alle im Anleitungen Fieber
Ein Freund hat folgendes für uns Fertig gemacht :
http://brushlessgimbal.de/brugi-v1/softwaremanuell/
Grüße
Passt
Wenn du nix dagegen hast , poste ich das mit auf der 1. Seite ?
Scheinbar sind gerade alle im Anleitungen Fieber
Ein Freund hat folgendes für uns Fertig gemacht :
http://brushlessgimbal.de/brugi-v1/softwaremanuell/
Grüße
Hey Graham,
great guide ... ;-) Posted by the user for the user
Maybe even a small addition.It may be that Windows 7 users can select any port <10, as these are already taken.
In this case, the hidden devices appear, what does not work in every case through the Control Panel.
Here, a new environment variable to be set."DEVMGR_SHOW_NONPRESENT_DEVICES" with a value of - 1.
Created devices can now be deleted and the controller are assigned to a port <10.*
Thanks for the work;-)
Greetings Henry
Na klar - mach mal, eigentlich wollte ich auch noch was schreiben *lach*
Danke - ich denke auch das es ein wenig aussagekräftig ist ;-)
Viele Grüße
Henry
great guide ... ;-) Posted by the user for the user
Maybe even a small addition.It may be that Windows 7 users can select any port <10, as these are already taken.
In this case, the hidden devices appear, what does not work in every case through the Control Panel.
Here, a new environment variable to be set."DEVMGR_SHOW_NONPRESENT_DEVICES" with a value of - 1.
Created devices can now be deleted and the controller are assigned to a port <10.*
Thanks for the work;-)
Greetings Henry
Hi Henry ,
Passt
Wenn du nix dagegen hast , poste ich das mit auf der 1. Seite ?
Scheinbar sind gerade alle im Anleitungen Fieber
Ein Freund hat folgendes für uns Fertig gemacht :
http://brushlessgimbal.de/brugi-v1/softwaremanuell/
Grüße
Passt
Wenn du nix dagegen hast , poste ich das mit auf der 1. Seite ?
Scheinbar sind gerade alle im Anleitungen Fieber
Ein Freund hat folgendes für uns Fertig gemacht :
http://brushlessgimbal.de/brugi-v1/softwaremanuell/
Grüße
Sehr sehr schön Henry!
Ich denke das hilft sehr viel. Viele denken immer noch es muss ein riesen Motor sein....
Viele Grüße
Martinez
Ich denke das hilft sehr viel. Viele denken immer noch es muss ein riesen Motor sein....
Viele Grüße
Martinez
Viele Grüße
Henry
Zuletzt bearbeitet:
habt ihr noch einen Tipp für Kabel? mein I2C Kabel ist leider viel zu steif.
LG ALex
LG ALex
Ich hab mir die gekauft:
http://www.hobbyking.com/hobbyking/store/__10936__Turnigy_Pure_Silicone_Wire_24AWG_1mtr_Black.html
könnten dünner sein, sind aber aus Silikon und deshalb viel besser als Servokabel.
Gruß
Martinez
Hello Ian,
OK Thank you,
You should definitely test the gimbal with a lower voltage.
- Can you put the camera on the pitch axis easily without turning the you realize a lot of resistance from the IMU cable?
- May vibrate the IMU cable and thus falsify the sensor values ​​..
Greetings Henry
OK Thank you,
You should definitely test the gimbal with a lower voltage.
- Can you put the camera on the pitch axis easily without turning the you realize a lot of resistance from the IMU cable?
- May vibrate the IMU cable and thus falsify the sensor values ​​..
Greetings Henry
habt ihr noch einen Tipp für Kabel? mein I2C Kabel ist leider viel zu steif.
LG ALex
LG ALex
Ich verwende übrigens 5 Adern von einem alten 40 poligen IDE- Kabel. Die 80 poligen waren mir dann doch etwas zu extrem dünn.

Hello Henry, I tried it on 2S power ( I was using 4S ) and I could increase the motor power up to 100 and 150 PWM
That`s better -
I can use on 3S 180 and 205 on Nick and Roll
Greetings Henry
Viele Grüße
Henry
Zuletzt bearbeitet:
Hallo zusammen,
hier mal ein kleiner Clip zum Thema:
- Gimbal Balance
- How much Power do you need
Vielleicht hilft es ja dem Einen oder Anderen ...
http://www.youtube.com/watch?v=pFRHZJ8TVxw&feature=youtu.be
Vielleicht als kurzer Hintergrund dazu:
Ist das Gimbal nicht richtig ausbalanciert, dann braucht man mehr Leistung (MAX-PWM) Je mehr Leistung man braucht umso zitteriger wird das Ganze System und man nähert sich dem Optimum nicht bzw. schlecht.
Dazu kommt noch das kein gleichmäßiges Dreh/Haltemoment zur Verfügung steht, und sämtliche Bewegungen unrund laufen. Insbesondere die PID- Regelung dürfte davon betroffen sein.
Viele Grüße
Henry
hier mal ein kleiner Clip zum Thema:
- Gimbal Balance
- How much Power do you need
Vielleicht hilft es ja dem Einen oder Anderen ...
http://www.youtube.com/watch?v=pFRHZJ8TVxw&feature=youtu.be
Vielleicht als kurzer Hintergrund dazu:
Ist das Gimbal nicht richtig ausbalanciert, dann braucht man mehr Leistung (MAX-PWM) Je mehr Leistung man braucht umso zitteriger wird das Ganze System und man nähert sich dem Optimum nicht bzw. schlecht.
Dazu kommt noch das kein gleichmäßiges Dreh/Haltemoment zur Verfügung steht, und sämtliche Bewegungen unrund laufen. Insbesondere die PID- Regelung dürfte davon betroffen sein.
Viele Grüße
Henry
Bitte mehr von deinen Flugvideos Posten, ich kann mich kaum dran satt sehen...
Zurzeit ist im Norden wohl besseres Flugwetter
Gruß
Kofferfisch
Hallo Henry,
Bitte mehr von deinen Flugvideos Posten, ich kann mich kaum dran satt sehen...
Zurzeit ist im Norden wohl besseres Flugwetter
Gruß
Kofferfisch
Bitte mehr von deinen Flugvideos Posten, ich kann mich kaum dran satt sehen...
Zurzeit ist im Norden wohl besseres Flugwetter
Gruß
Kofferfisch
Thank you just want to help were I can will update later with more info when it is available.
will update later with more info when it is available.
It is the same as an old floppy cable.
I've just cutted 5 wires of them .
Something you've determined there somewhere;-)
Yes the Cable ist good.
PS: Thanks for Updates ;-)
Greetings Henry
Zuletzt bearbeitet:
Bezüglich Kabel, ich benutze diese hier mit 26AWG.
Die haben sogar noch dünnere, nur im Moment nicht in stock.
Die 26er sind aber absolut ok, günstig und in 2 Tagen in Deutschland!
Die haben sogar noch dünnere, nur im Moment nicht in stock.
Die 26er sind aber absolut ok, günstig und in 2 Tagen in Deutschland!
- Status
- Nicht offen für weitere Antworten.